Today's post is an excerpt from the book Existing Light Techniques for Wedding and Portrait Photography, by Bill Hurter. It is available from Amazon.com and other fine retailers.
In addition to window light, many incredible portraits are made using the existing light from man-made sources, such as room lights, lights on the dance floor at a wedding, or even street lights. Keep in mind when using these sources that long exposures may be required; few man-made lights are as intense as photographic flash. As such, shooting from a tripod or using an image-stabilization lens is a good idea just to ensure critical sharpness. It’s also important to note that using man-made existing-light sources often results in portraits that are not “traditionally” lit—but don’t let that dissuade you from shooting when the light is less than perfect. As the portraits in this section show, lighting that defies convention is often extremely appealing.
“Can” Lights. Australian photographer Yervant is renowned for his ability to find interesting existing light sources on location.
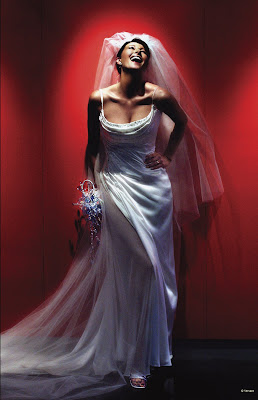
One of his most widely recognized shots (below) was actually created using the overhead “can” lights in an underground parking garage. Short on time, Yervant realized he had not done any formal bridal portraits on the wedding day, and coaxed the bride down to the parking garage for a few shots. To make use of the lighting directly overhead, he had her throw her head back in laughter so that the light would fill her face instead of obscuring her eyes in shadow. This shot illustrates not only the resourcefulness of the wedding photographer on location, but also the ability to see light and recognize a prime location.
 This is a classic and award-winning shot by master wedding photographer, Yervant. It was done not using studio strobes, but an overhead “can” light in an underground parking garage.
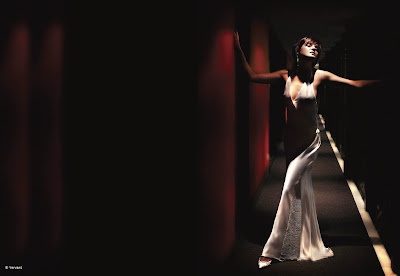
 Yervant’s success with “can” lighting was hardly a one-shot deal. In the image shown below, he had the bride stop under a hotel’s overhead light—a spot that blasted a small area of the wall and carpet with a sharp, hot light. He positioned the bride so that the single light would reveal her shape, then had her glance up into the light to create highlights on the frontal planes of her face. She liked the image so much that it ran over two pages in her wedding album.
 Light is where you find it and what you make of it. Here, Yervant used an overhead “can” light—hardly what most photographers consider ideal—to create an extremely dramatic image.
 Exterior Lights. Sometimes great directional lighting is right in front of you—regardless of the time of day or night. Photographer Kevin Jairaj recalls the setting for one of his most memorable images (below). “I discovered a spot-lit wall,” he says. “I wanted the bride’s face to be highlighted by the beam of light, so I had her stand with her back against the wall with her face tilted upward toward the light. The reason this shot was successful was because I used all existing light and a long exposure with my camera on a tripod to capture the moment. I really wanted to try something a bit more dramatic and edgy to match the ambiance of the location.” It’s proof that with refined powers of observation, you can find great existing light in some unexpected locations.
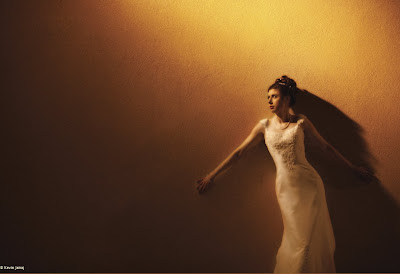 Kevin Jairaj was finishing up a session late in the evening when he happened to see this wonderful directional beam. He persuaded the bride to take a few shots in this spot.
So how do you quickly determine what is there and how to utilize it to the best of your abilities? David Beckstead says he walks into the room and squints his eyes so that all the complexity of the colors and textures fades away to nothing but darks and lights. He then opens his eyes widely and goes to the light, looking to see if this natural light can be used as a line leading to his subjects (for a creative effect), then backing off to see how the light can be used in a broader overall composition. Once he has digested this information he goes ahead with his first “safe” shot, as he calls it, often using the natural light. He can then utilize the time between other upcoming “safe” shots to experiment with other artistic interpretations. This strategy helps David avoid a common tendency among photographers to go directly to the subject and start shooting without taking a moment to see all the possibilities.
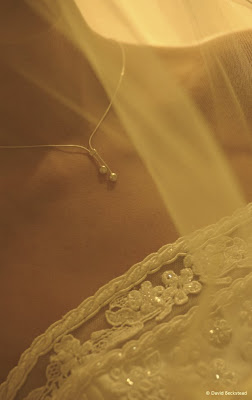
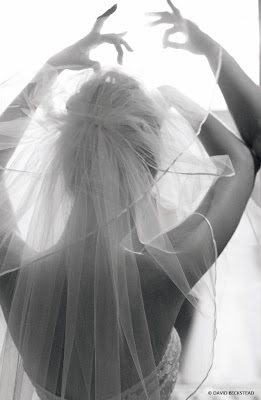 David Beckstead loves natural light and has attuned himself to its many uses by analyzing a scene to see the full potential of the light source. He prefers back and side lighting, but knows that the hallmark of a real professional is being able to create an amazing portrait using whatever light he’s dealt.
OUTDOOR LIGHTING
Nature provides every lighting variation imaginable—that’s why so many images are made with it. Often, the light is so good that there is just no improving on it.
For example, I used to work for a major West Coast publishing company that specialized in automotive magazines. One of the studios we used for photographing cars was massive, with a ceiling that was between three and four stories high. Below the ceiling was a giant scrim suspended on cables so that each of the four corners could be lowered or raised independently. Enormous banks of incandescent lights were bounced into the scrim to produce a huge milky-white highlight the length of the car—a trademark of automotive photography. Despite the availability of this space, if time and the weather were on their side, the staff photographers would invariably opt to photograph the car at twilight, when the setting sun, minutes after sunset, creates a massive skylight in the Western sky. No matter how big or well equipped the studio, nature’s light is far superior in both quantity and quality (although it fades rather quickly).
In order to harness the power of natural light, one must be aware of its various personalities. Unlike the studio, where you can set the lights to obtain any effect you want, in nature you must use the light that you find or find ways to modify it to suit your needs.
Avoid Direct Sunlight. By far the best place to make outdoor images is away from direct sunlight. Look for a clearing in the woods, where the trees block the overhead light from hitting the subject. From the clearing to the side, diffused light will filter in, producing better modeling on the face than in an open area (where the light is overhead in nature and leaves deep shadows in the eye sockets and under the nose and chin of the subjects.
Kevin Jairaj, who makes it a habit to look for good directional lighting recommends looking for an outdoor portico, where light from above is blocked by a roofline or other architectural element. This allows soft directional light to spill in from the sides, usually through open columns that provide beautiful compositional elements. Depending on how you position your subjects in relation to this directional light, it can be frontal or side lighting—but it always has a singular and well-defined source point. Kevin says, “When outdoors, I love shooting under awnings or building tops where I am able to see the light coming in from one side. I normally place the bride so that her face is turned into the directional light, producing soft Rembrandt lighting on her face.”
Working at Midday. Working at midday is a necessity for wedding photographers, as most ceremonies are during the middle of the day.
Nature provides every lighting variation imaginable—that’s why so many images are made with it. Often, the light is so good that there is just no improving on it.
For example, I used to work for a major West Coast publishing company that specialized in automotive magazines. One of the studios we used for photographing cars was massive, with a ceiling that was between three and four stories high. Below the ceiling was a giant scrim suspended on cables so that each of the four corners could be lowered or raised independently. Enormous banks of incandescent lights were bounced into the scrim to produce a huge milky-white highlight the length of the car—a trademark of automotive photography. Despite the availability of this space, if time and the weather were on their side, the staff photographers would invariably opt to photograph the car at twilight, when the setting sun, minutes after sunset, creates a massive skylight in the Western sky. No matter how big or well equipped the studio, nature’s light is far superior in both quantity and quality (although it fades rather quickly).
In order to harness the power of natural light, one must be aware of its various personalities. Unlike the studio, where you can set the lights to obtain any effect you want, in nature you must use the light that you find or find ways to modify it to suit your needs.
Avoid Direct Sunlight. By far the best place to make outdoor images is away from direct sunlight. Look for a clearing in the woods, where the trees block the overhead light from hitting the subject. From the clearing to the side, diffused light will filter in, producing better modeling on the face than in an open area (where the light is overhead in nature and leaves deep shadows in the eye sockets and under the nose and chin of the subjects.
Kevin Jairaj, who makes it a habit to look for good directional lighting recommends looking for an outdoor portico, where light from above is blocked by a roofline or other architectural element. This allows soft directional light to spill in from the sides, usually through open columns that provide beautiful compositional elements. Depending on how you position your subjects in relation to this directional light, it can be frontal or side lighting—but it always has a singular and well-defined source point. Kevin says, “When outdoors, I love shooting under awnings or building tops where I am able to see the light coming in from one side. I normally place the bride so that her face is turned into the directional light, producing soft Rembrandt lighting on her face.”
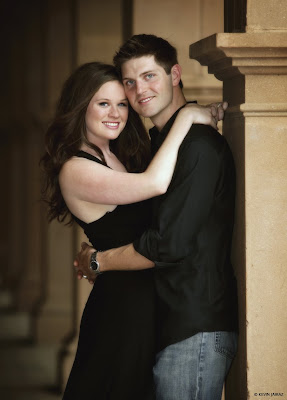 In this image, the couple was positioned facing the soft light coming into the portico. It’s as if a large softbox was positioned nearby to provide elegant portrait lighting. Photo by Kevin Jairaj.
The best system if working at midday is to work in shade exclusively. Try to find locations where the background has sunlight on dark foliage and where the difference between the background exposure and the subject exposure is not too great—no more than 2.5 stops.
It is often impossible to avoid photographing out in the open sunlight on wedding days. In this case, the best strategy is to use the sun as a backlight and bias the exposure toward the shadow side(s) of the subject(s). This is where it’s advisable to bring along an assistant who can flash a reflector into the shadow side of your couple to fill in the effects of the backlighting. A reflector is most effective when held below waist height and angled to bounce the overhead backlight back up onto the subject. Moving the reflector around and up and down will give you an idea of how much light it can reflect and where to position it. In bright situations, use a white reflector, so as not to overpower the natural light. In very soft light, use a gold or silver reflector for increased efficiency.
It is important to check the background while composing a portrait in direct sunlight. Since there is considerably more light than in a portrait made in the shade, the tendency is to use an average shutter speed like 1/250 second with a smaller than-usual aperture like f/11. Small apertures will sharpen the background and distract from your subject. Preview the depth of field to analyze the background. Use a faster shutter speed and wider lens aperture to minimize background effects in these situations. The faster shutter speeds may also make it impossible to use flash, so have reflectors at the ready.
Low-Angle Sunlight. If the sun is low in the sky, you can use cross lighting to get good modeling on your subject. To do this, simply turn your subject into the light so as not to create deep shadows along laugh lines and in eye sockets. (Note: If photographing a group, be sure to position your subjects so that one person’s head doesn’t block the light from striking the face of the person next to him or her.
In this scenario, there must be adequate fill-in from the shadow side of the camera to ensure that the shadows don’t go dead. This is often done using a flash set to about a stop less than the daylight exposure. Of course, a reflector can also be employed (and carefully placed) to bounce the direct sunlight back into the shadow side of the face. Again, it’s always best to use an assistant in this situation.
After Sunset. As many of the great photographs in this book illustrate, the best time of day for making great pictures is just after the sun has set. At this time, the sky becomes a huge softbox and the effect of the lighting on your subjects is soft and even, with no harsh shadows.
There are, however, two problems with working with this great light. First, it’s dim. You will need to use medium to fast ISOs combined with slow shutter speeds. In these situations, selecting an image-stabilization lens will expand your options by allowing you to handhold at extremely slow shutter speeds like 1/4 or 1/8 second.
The second problem in working with this light is that twilight does not produce catchlights, the white specular highlights in the eyes of the subjects that make them sparkle with life. For this reason, most photographers augment the twilight with flash, either barebulb or softbox-mounted. The flash can be up to two stops less in intensity than the skylight and still produce good eye fill-in and bright catchlights.
Controlling the Background. For a portrait made in the shade, the best type of background is monochromatic. If the background is all the same color the subjects will stand out from it. Problems arise when there are patches of sunlight in the background. To minimize these, you can shoot at a wide lens aperture and use the shallow depth of field to blur out the background. When working outdoors, some photographers also control the background by placing more space between it and the subject, throwing the background further out of focus.
Another way to minimize a distracting background is in postproduction retouching and printing. By burning-in or diffusing the background, you can make it darker, softer, or otherwise less noticeable. This technique is really simple in Photoshop, since it’s fairly easy to select the subjects, invert the selection so that the background is selected, and perform all sorts of manipulations on it. You can also add a vignette of any color to visually subdue the background.
On outdoor shoots in particular, one thing you must especially watch out for is subject separation from the background. A dark-haired subject against a dark-green forest background will not separate, creating a tonal merger. Adding a back-side or edge reflector to kick some light onto the hair would be a logical solution to such a problem.
Cool Skin Tones. If your subject is standing in a grove of trees surrounded by foliage, there is a good chance green (or cyan from the open sky) will be reflected onto their skin. This can be hard to detect, since your eyes will adjust to the off-color rendering. of the skin tones. The best strategy is to check the coloration in the shadow areas of the face. If the color of the light is neutral, you will see gray in the shadows; if not, you will see either green or cyan.
Before digital capture, if you had to correct this coloration, you would use a color-compensating filter over the lens. By selecting a complementary color filter, you could neutralize the color balance of the light. With digital, you only need to perform a custom white balance or use one of the camera’s preset white-balance settings, like “open shade.” Those who use the ExpoDisc also swear by its accuracy in these kinds of situations.
There are times, of course, when you want the light on the skin to be warm, not just color-corrected. To do this, you can use a gold-foil reflector to bounce warm light onto the subject. The reflector does not change the color of the foliage or background, just the skin tones.


No comments:
Post a Comment