
Today's post is an excerpt from the book LED Lighting: Professional Techniques for Digital Photographers, by Kirk Tuck. It is available from Amazon.com and other fine retailers.
TWO PRACTICAL APPROACHES
As with any new lighting instrument, photog raphers have had to learn how to leverage LEDs to maximize the benefits. I divide my use of the LEDs roughly into two approaches. The first approach uses LED to support or enhance the existing light; the second uses LED as the primary source of light.
Augmenting the Existing Light. Many assignments move quickly and call on me to improve the light I find on locations, not to totally replace it. In these situations, I depend on battery-powered units that are small and lightweight. Just as one might use a battery-powered flash to add fill light to a scene that’s predominantly lit by ambient light, I can use one small LED panel to add just the right amount of fill light or accent light to a scene.
Using this approach, a wedding photographer might want to use a tungsten-balanced, battery-powered unit in a ballroom to bring the light level on a bride up to the same level as the ballroom’s background so the contrast isn’t too extreme. A portrait shooter who does lots of outdoor portraits might need a little extra fill light in an open-shade location (to make sure that eyes look good and wrinkles are minimized) and find that a little LED panel—or two linked together—is a good match for daylight color temperature. Having an assistant hold one a few feet over to one side of the subject is a quick, convenient, uncomplicated, and aesthetically “just right” solution.
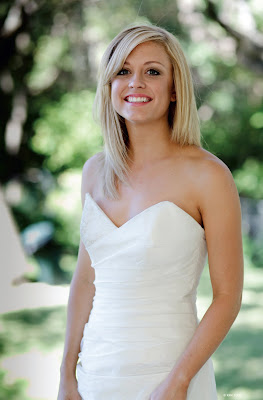
In fact, that’s just what I did with this portrait of Jana. She was standing under a covered patio with sun and trees in the background. To add soft light for fill and bring up the level of illumination, I used four small LED panels, covered with diffusion material, on a stand to the side of the model. These provided just enough illumination to make the photo work for me.
A corporate photographer might be tasked with capturing people at work. With the right small LED panel, she’ll be able to add just enough fill to counteract the unflattering top-light of the ubiquitous office fluorescent lights—without the unwanted attention caused by multiple flashes, extra cables, and battery packs. Anywhere that a little supplemental lighting may make the difference between a good photo and a great photo is a natural situation for smaller panels.
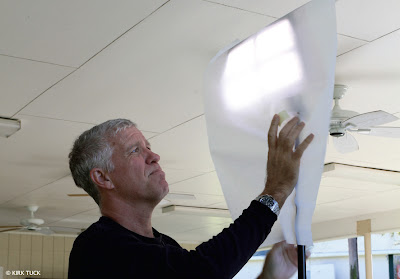
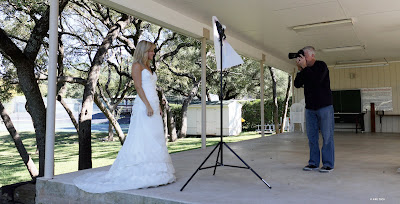
I started the setup by snapping together four of the DLC DV 60 units. I knew I’d need the power to get close to matching the sun. Note that they were covered with a very light magenta filter to match the daylight. Then I added a sheet of diffusion material over all four lights. This softened the light and made it easier on Jana’s eyes. I positioned the light as close as I could to Jana, as you can see in the overall view of the shoot setup.
LED as the Primary Light Source. The other way to use LEDs is to implement the larger panels that run off household A/C current in the same way that studio photographers now use electronic flash and softboxes. As portrait photographers, we’ve spent years sitting people down in a studio and aiming electronic flash units in large softboxes at them as main lights. We used additional small softboxes and flashes for background lights and hair lights and even fill lights. In most cases, all of these can be handily replaced by LED panels and modifiers.

