
Today's post, which provides a sampling of five artistic/technical tips for getting the best-possible shots on the wedding day, comes from the book 100 Techniques for Professional Wedding Photographers by Bill Hurter. It is available from Amazon.com and other fine retailers.
Recognize What's Special
Greg Gibson, a two-time Pulitzer Prize–winning journalist turned wedding photographer says, “All weddings are alike on some level—there’s a couple in love, they’re going to have this big party, there’s the anticipation, the preparation, the ceremony, the party. It’s like the movie Groundhog Day. The challenge is to find the nuances in each event.” Every wedding offers new experiences and new challenges, and this is what Gibson says keeps him fresh through fifty weddings per year. “It’s fun. When I go to a wedding, people are always glad to see me, I’m welcomed in. When I was a journalist, that wasn’t always the case; Monica [Lewinsky] wasn’t happy to see me when I showed up at the Mayflower Hotel.” This allows him to remain unobtrusive and not impose on moments that should remain natural and genuine, a primary means of preserving a wedding’s uniqueness.
 There is no shot-list entry for this image by Joe Buissink, who shoots most of his weddings on film. Joe is a keen observer and knows a great shot in the making when he sees one.
Perhaps because of its romantic nature, photographers who are also born romantics often find it easier to capture the special relationship shared by each couple. As photographer Michael Schuhmann says, “I love to photograph people who are in love and are comfortable expressing it—if they are so in love that they can’t contain it, then it’s real.” Being a romantic is not completely necessar y, of course—after all, weddings are celebrations, which means they are also about having fun. The wedding photographer gets to be part of this joy.
The uniqueness of the event will also reveal itself more fully when the day is viewed as a story. By linking the spontaneous events of the day, sensitive portrayals that highlight the emotions elicited, you can build a visual narrative that sets each wedding apart from all others. This what the modern bride wants to see in her wedding coverage.
Shoot Peak Action
Sports photographers learn to react to an event by anticipating where and when the exposure must be made. A pole-vaulter, for example, is ascending at one moment and falling the next—and right in between there is an instant of peak action that the photographer strives to isolate. Even with high burst rates, however, it is not a question of blanketing a scene with high-speed exposures; it is knowing when to press the shutter release. With a good sense of timing and solid observation skills, you will drastically increase your chances for successful exposures in wedding situations. By being prepared for each event, being ever alert, and refining your reaction time you can also improve your odds.
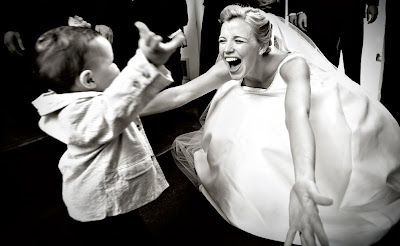 No one has better reactions and storytelling skills than a Pulitzer Prize–winning photojournalist. Here, Greg Gibson captured the full gamut of emotion as these two connected.
Be Prepared. Being prepared to capture each moment starts with doing your homework. The more you know about the scheduled events and their order, the better you can prepare to cover those events as effectively as possible. Discussing the wedding plans with the other vendors involved (the wedding planner, DJ, caterer, officiant, etc.) and visiting each venue is an excellent way to prepare. What you learn is critical to developing your game plan; it will allow you to choreograph your movements so that you are in the optimum position for each phase of the wedding day. The confidence that this kind of preparation provides is also immeasurable.
Observe and React Quickly. Within this framework of “planned” events, however, you should always be watching and monitoring each moment as it unfolds around you—and this usually means watching more than one event at a time. Keep your camera constantly at the ready. You may want to leave it in one of the AE modes so there are no exposure adjustments to be made. Simply raise the camera, compose, and shoot.
With quiet observation, many wonderful moments can be captured. Being able to do this effectively is a function of completely trusting yourself to translate input into instant reaction. Master wedding photojournalist Joe Buissink says, “Trust your intuition. Do not think. Just react or it will be too late.”
Clean Your Image Sensor
The image sensor in a digital camera must be kept clean in order to perform to its optimum level—otherwise, spots may appear on your images. Canon digital cameras have a built-in sensor-cleaning mode. This lifts the camera’s reflex mirror so that light air from an air syringe can be used to gently remove any foreign matter. Turning the camera off resets the mirror. The newest DSLRs feature a sonic vibration sensor-cleaning mode that is fully automatic and does not involve you having to touch the sensor all. (Note: The image sensor is an extremely delicate device. Do not use compressed air cans to clean it; these have airborne propellants that can coat the sensor in a fine mist, worsening the situation.)
Select the Optimal Color Space
Many DSLRs allow you to shoot in the Adobe RGB 1998 or sRGB color space. There is considerable confusion over which is the “right” choice. Adobe RGB 1998 is a wider gamut color space than sRGB, so many photographers reason that this is the best option. Professional digital-imaging labs, however, use sRGB for their digital printers. Therefore, photographers working in Adobe 1998 RGB may be somewhat disheartened when their files are reconfigured and output in the narrower sRGB color space. As a result, many photographers use the Adobe 1998 RGB color space right up to the point that files are sent to a printer or out to the lab for printing.
Is there ever a need for other color spaces? Yes. It depends on your particular workflow. For example, all the images you see in this book have been converted from their native sRGB or Adobe 1998 RGB color space to the CMYK color space for photomechanical printing. As a general preference, I prefer images from photographers be in the Adobe 1998 RGB color space, as they seem to convert more naturally to CMYK.
In Adobe Camera Raw and other RAW-file processing software there exists another color space, which has become quite popular, called ProPhoto RGB. It is a “sticky” color space, meaning that it adds color data to the file. The added data cannot be seen on monitors currently sold, but what can be seen is the increased resolution and size of the image file. A typical RAW file made with a Nikon D200, which uses a 10.2MP sensor, produces a file in the neighborhood of 22 or 23MB. A good size file, to be sure—but when ProPhoto RGB is used to process the image in the RAW file processor, the file opens at 72MB, a very healthy increase in file size and potential resolution. Many photographers who shoot RAW, and also make large prints, process the images in this color space to take advantage of the added color data and larger file sizes.
Speeding Up Your Group Portraits
The best man and ushers can usually be persuaded to help organize large group photos. Be sure to have everyone make it sound like fun—it should be. One solution is to make your formal groups at the church door as the couple and bridal party emerge. Everyone in the wedding party is present and the parents are nearby. If you don’t have a lot of time to make these groups, this is a great way to get them all at once—in under five minutes.
 This is the “bouquet of flowers” treatment for groups. Shooting from directly above to capitalize on the symmetry of the composition, Dan Doke created a beautiful portrait of the bride and her maids. Using an 85mm lens, the perspective is good and normal. With a wide-angle lens, faces this close to the frame edges would have been distorted.
 This is the “bouquet of flowers” treatment for groups. Shooting from directly above to capitalize on the symmetry of the composition, Dan Doke created a beautiful portrait of the bride and her maids. Using an 85mm lens, the perspective is good and normal. With a wide-angle lens, faces this close to the frame edges would have been distorted.


