skip to main |
skip to sidebar

Today's post is an excerpt from the book Wedding Photojournalism: The Business of Aesthetics, by Paul D. Van Hoy II. It is available from Amazon.com and other fine retailers.
Even if you’re an established professional wedding photographer with a couple seasons to your credit, client consultations can still be hit and miss—which means you could be leaving a lot of money on the table. The best way to ensure your business’s continued growth is by upping your consultation IQ and becoming a strong closer!
CONSULTING WITH CLIENTS
Consulting with prospective clients often proves to be a precarious game of cat and mouse. For beginning professionals, consultations are as nerve-racking as tightrope walking over a pit of angry alligators. No kidding—some of my first sessions were so awkward and uncomfortable that I seriously reconsidered whether wedding photography was the right profession for me.
Fourteen seasons later, I’ve concluded that the key to becoming an effective closer is control; you must know how to establish and maintain it at all times. When I say take control, I mean lead the pacing and progression of the consultation from start to finish. This doesn’t mean that you should bully or browbeat your clients. Rather, you must be personable and charismatic—and above all, a good communicator.
Whether you’re a wallflower or a social butterfly, I believe that everyone possesses the ability to be charming and engaging. The real challenge is being able to win over the many types of clients who might come through your door. This means that, beyond being personable and persuasive, you must also be able to accurately read your clients so that you can quickly “change up” your approach to suit a variety of interactive scenarios.

What's your primary style? Posed and formal, relaxed, photojournalistic, creative, artistic, candid, or traditional?
One way to build confidence and overall preparedness is to be preemptive; know what questions your clients are likely to ask you—and, more importantly, know which ones they’re unlikely to ask. Be prepared for those curveballs. Having a well-practiced repertoire of rebuttals and redirections is essential to becoming an effective closer.
It’s common for brides to come prepared with their bulging three-ring binders (I jokingly refer to them as “matrimony manifestos”), complete with a copy of “Questions To Ask Your Photographer.” Here’s a sample of some of the stock questions you may be asked: • What’s your primary style? Formal, relaxed, photojournalistic, creative, artistic, candid, traditional?• Do you shoot in color or black & white? Or both? Do you shoot in a digital format that can create both color and black & white versions of the same picture?• What kind of input can we have on the direction of the shots? Can we give you a shot list?• Are you the wedding photographer who will actually take our pictures? If not, can we meet the person who will be?• Can we meet any assistants who will also be taking our pictures?• How many times have you worked as a wedding photographer? How many events were similar to the size and formality of our wedding?• How many other events will you also photograph that weekend?• What kind of equipment will you bring with you? How intrusive will lighting, tripods, other equipment or assistants be? You should familiarize yourself with these questions so that you will be able to provide full, detailed answers upon request—but never let your client lead the session with their list of questions. An invaluable tip here is to be informative while remaining conversational; satisfy these questions before they’re asked. This is a hallmark of a seasoned professional.
By providing a thorough and comprehensive breakdown of your services you will demonstrate to clients that you have a sincere interest in allaying their questions and concerns—and, more importantly, that you identify with them. I strive to go above and beyond just answering the cursory questions like, “Do you bring backup equipment to every wedding?” I make it a point to introduce new questions for my clients to ask of other photographers they might interview after their session with me. I inform them on a range of topics from the importance of shooting in RAW to why a legitimate professional wedding photographer should carry liability insurance.
As much as I would like to secure a signed contract and be the last photographer my couples meet with, I will actually urge them to consult with other professionals before making their final decision.
You might be scratching your head and thinking that this tactic completely undermines the desired outcome, but I’ve found it to be a highly effective psychological strategy. Attempting to close clients on the day of the consultation can be off-putting; it may seem pushy or desperate. Even if I feel that I’ve won the couple’s favor, I grant them time to weigh their options. I tell them that I understand that selecting the right wedding photographer is a significant decision not to be made in haste, and that they should meet with others and give themselves ample time to determine which photographer is right for them. Last but not least, I alleviate assumed pressures and deadlines for issuing a decision by letting brides know that, as a courtesy, I will tentatively hold their date until I receive a definite yes or no from them.
Playing it cool is a definite winning strategy for closing prospective clients; it conveys that you have a great deal of confidence and trust in your own work and professionalism, which inspires reciprocal confidence and trust from your clients.
Never regard clients as customers. Some photographers feel most comfortable getting down to business the very moment a couple passes through their door. For me, it’s common to spend the first fifteen to thirty minutes engaging the clients on a personal level. I’m genuinely interested in learning about the lives of those who may potentially commission me to document their special day. Be sure to inquire about their careers, educational backgrounds, personal interests, passions, avocations, etc.—and don’t forget to ask about how they met! The answers you receive to these questions will break the ice and open the door to discourse.

Do you know what the average bride in your regional market expects to pay for her wedding photography? Do you know what inclusions and amenities she expects in a basic or premium wedding package?
The more you know about your clients, the easier it will be to develop a personal connection. While professionalism, quality, and price are all determining factors, clients are far more likely to book with a photographer they like and feel a strong rapport with.
My best advice is to abandon premeditated sales pitches—and to stop relying on an encyclopedic set of albums to distract your clients and spare you from the awkwardness of making small-talk. Trust me, if a bride schedules a consultation session, she is already familiar with your photographs; she’s interested in familiarizing herself with you, the photographer. Yes, she’s interested in learning more about your packages and philosophies, but ultimately she wants to find out more about your personality. Will you contribute to the stress and chaos of the wedding day, or are you the calming type who has a knack for diffusing stressful situations? Are you likely to have positive interactions with her wedding party, family, and guests, or will you be the aloof type that avoids eye contact and incites awkwardness in others?
So, when it comes time for your next consultation, proceed as you would if you were casually meeting with old acquaintances to help them choose the best wedding photographer and demonstrate how you fit that profile. Be genuine and forthcoming; satisfy all their questions and concerns in a conversational context. Your goal should not be slam-dunking a pair of prospects, it should be to make new friends and share your profession—and your passion for it—with a captive audience.
DO YOU REALLY KNOW WHAT BRIDES WANT?
Do you know what the average bride, in your regional market, expects to pay for her wedding photographer? Do you know what inclusions and amenities she expects in a basic or premium wedding package? Do you know how your business model (i.e., the services and products you offer as well as your pricing/packaging structure) is perceived by prospective clients?
Knowing your audience is one of the most critical, yet often overlooked, aspects of building a successful enterprise. Gaining awareness of what appeals to prospective clients can help you align your business model so that you can increase your yearly bookings and ramp up your yearly revenue. It can also help you get a leg up on your competition and take over that number-one spot within your local market.
I workshop with a lot of wedding photographers who understand technical aspects of image-making and the logistics of business. When it comes to relating to clients and their concerns, though, they often return a blank, confused look—much like your clients would if you tried to engage them on the topic of color space.
Simply stated, most wedding photographers understand the business relationship from the photographer to the client, but not the reverse—from the client to the photographer.
So, how does one gain access to the client’s perspective and all the valuable insights they have to offer by way of critical and candid discourse? You simply ask.
During my consultation sessions, I always make it a point to ask, “Have you had an opportunity to speak with or meet any other local wedding photographers?” If they have, I follow up with, “What was your experience/interaction with that individual like?” Quite honestly, if they were head-over-heels for another photographer, they know your audience wouldn’t be sitting on my couch looking for something they had already found elsewhere.
If you’re hesitant to ask these questions, fearing they might come across as prying or offensive, don’t be. In my fourteen years of experience, I can’t recall a single occasion when I offended a client by asking these questions. Some might feel more comfortable withholding the names of those they’ve met with, but generally clients will talk freely and openly about their interactions and experiences with other professionals.
The answers you receive will provide you with a more precise idea of the couple’s decision-making criteria. Are they most concerned with price, product, or personality—the personal connection they feel toward their wedding photographer? The feedback you receive will help you focus on the topics most relevant to your client’s list of concerns.
UNDERSTANDING THE COMPETITION
Equally important to gaining awareness of your audience is having understanding of your competition and how you rank among it (in your own eyes). If you haven’t already, you should acquaint yourself with the other professionals—their portfolios and business models—within two hundred miles of your studio/area of coverage.
If you can find out who you’re up against and learn their strengths and weaknesses, you can even the playing field, so to speak, by emphasizing aspects of your business (shooting style, product quality, packaging, pricing structure, etc.) that might rank favorably over your competition and help persuade the client to select you.
CONCLUSION
The bottom line is this: although you may know the ins and outs of what you’re selling, unless you know whom you’re selling to, you may be fighting a frustrating and futile battle. (As my grandfather used to say, you might be trying to sell snow cones to Eskimos.) It’s very easy to sell people what they want—and finding out what they want is as easy as paying attention to your audience and asking a few simple questions.

Today's post is an excerpt from the book How to Create a High-Profit Photography Business in Any Market (2nd ed.). It is available from Amazon.com and other fine retailers.
Like many other photographers, one of my first paid assignments was photographing a wedding. For those getting into the photography business, weddings are generally the first step, as all you need is a camera, a flash unit, and hopefully a backup system.
On the other hand, it’s not unusual for a photographer to stop doing weddings once they have enough other work to keep the studio busy. I find it rather strange that weddings are the first thing many photographers start with, but it is also the first thing many of them stop doing. For some photographers, it’s almost like a badge of honor to be able to say, “I no longer photograph weddings.”
Weddings are not for everyone, that’s for sure. Why do some photographers love doing weddings, while others quit the moment they have enough other work? Having excellent photography skills is only a small part of being a successful wedding photographer. In this section, I will explain what works for us.

Wedding photography is a common entry point for those looking to dive into photography as a career.
THE TYPE OF CLIENT
As I have mentioned throughout this text, you need to determine the type of client you want to attract. Whether you are doing fire hall/VFW-hall weddings or country club and high-end hotel weddings will be determined by many factors. Price, photography skills, studio décor, phone skills, and service will all play a big part in the type of clients you attract. Don’t forget: you must have a very pleasant, likeable personality to convince the bride you are just the person she is looking for. If she doesn’t like you, she’ll never book the wedding with you, regardless of how beautiful the photography is.
TELEPHONE SKILLS
Almost all wedding bookings start with the telephone. Of course, we already know that good telephone skills are essential—not only for weddings but across the board. You simply must have a person with excellent skills on the telephone.
When a bridal client calls, the first question they usually ask is how much you charge to photograph a wedding. I believe they don’t know what else to ask, so they start out with the price question. Many times they will ask for a price before they even know if you are available!
We’ll assume that you are not a low-end wedding photographer and that the prices you are charging are for the average to higher-end client. The best way to deal with a wedding call is to engage the caller with questions about their upcoming wedding. Our end of the conversation with our prospective wedding clients goes something like this: “Congratulations, Lisa, on your upcoming wedding. What is the date? Where are you getting married? Where will the reception be held?”
By engaging the caller with questions, you can determine if they are going to be interested in your services. If they are calling in response to your Yellow Pages ad, chances are they will select a wedding photographer based on price and nothing else. They are looking for what I call the “BBD” (bigger, better deal). Quality and service are not important—they just want the cheapest photographer they can find.
On the other hand, when a bride calls and does not ask about pricing but wants to come into your studio to view your work and meet with you, chances are she is serious about professional wedding photography. Her main concern is not price but quality—and your reputation. These are the clients you want.
CONSULTATION
When the client comes into the studio, show them two or three completed albums. We use flush-mounted albums from Capri Albums from New York for our studio samples. They are very upscale and beautiful. While the client is viewing the albums, point out what makes your photography worth your higher prices. Photo examples of excellent posing and natural lighting should be present in your studio sample albums. After all, if the client can’t see what makes your pictures different from a lower-cost studio’s images, then there is no reason for them to pay the difference. Since all brides are different, find out what type of photography the client likes best and focus on the work that suits her tastes.

Showing prospective clients samples of your work from past weddings is important for helping them to determine whether or not your style suits their tastes.
If the bride decides she wants to book you, be certain that she fully understands all of your payment procedures and policies. Try to keep it all very simple. Clients get uneasy about any transaction they don’t fully understand. On a related note, be sure to take notes on anything that you will need to know on the wedding day. Issues such as divorced or deceased parents are things that you should be aware of ahead of time.
We require approximately 15 to 20 percent of the total price as a deposit or retainer to hold the date. Any refunds are handled on an individual basis depending upon the circumstances, and I can honestly say that, at our studio, cancellations are rare.
About a week prior to the wedding we call the bride to confirm everything. We remind her of the times that have been agreed upon and emphasize to her that being on time will make everything less stressful. The key to a good day with a bride is giving her as much information as you can. You know from experience about how long everything will take and how to make things run smoothly.

Often, my assistant takes a shot like this from the balcony. Shooting with an assistant during the ceremony is important, since you can't be in two places at once.
THE WEDDING DAY
I photograph weddings with an assistant. You certainly can do it on your own, but why knock yourself out? My assistant works on the candid photos while I concentrate on the posed ones. It’s a good combination and a good way to offer a better product.
Before the Ceremony. On the day of the wedding, my assistant and I arrive approximately fifteen minutes before the agreed-upon time, dressed in black tuxedos. The vehicle that we arrive in has been cleaned, and we look totally professional. Image is everything!
When we arrive at our first destination of the day, I look for areas where I can photograph the bride with window light. Use your flash as little as possible: this will separate your work from the competition.
The Ceremony. During the ceremony, having an assistant gives you the opportunity to photograph the wedding from different areas of the couple’s venue. We have some beautiful photographs where the bride and groom are coming down the aisle after the ceremony—I shoot images from their level, and my assistant takes the same shots from up in the balcony. I just don’t think it’s possible to cover a wedding as well with one person as you can with two.
After the Ceremony. After the ceremony, we generally do the posed photographs of the family members. I find it best to start with the grandparents, then photograph the parents and family members, and then handle any other special groups the bride and groom may want photographed. We finish this sequence with photographs of the bride and groom. Keeping things moving and being quick is the key. Depending on the size of the wedding party, you should be able to do all of the groups and bride and groom shots in about forty-five minutes.
After the ceremony, many couples want to go to an outdoor location for more photographs. To make your outdoor photographs look their very best, be sure to use a long lens so that the backgrounds will be out of focus. This will make the bride and groom really stand out.
The Reception. Once you get to the reception, most of the hard work is behind you. Most receptions last at least three to four hours, and we usually stay most of the evening, since our pricing is set up to cover a ten- to twelve-hour day. Many studios charge by the amount of time the bride has booked. Although there is certainly nothing wrong with that practice, I have never charged that way; I think it would just cause problems—after all, anyone who has done their fair share of weddings knows that things usually do not go as planned time-wise. I don’t want to have to approach the bride during the reception and remind her that she only booked us for the eight-hour coverage, so we will be leaving shortly.
I know of one photographer who stays for only the first thirty minutes of the reception. Of course, the bride knows all of this beforehand, and the photographer arranges for her to get everything over in the first thirty minutes—the toast, dancing with dad, cutting the cake, you name it—just so he can go home early! If it’s working for him, great. I know one thing for sure: if my daughter went shopping for a wedding photographer and he told her he would be leaving the reception after thirty minutes, he wouldn’t be hired.
LENS SELECTION
I recommend that you have available several different types of lenses to use during the wedding day. Use lenses that the amateurs at the wedding probably don’t own; using a very long lens or a fish-eye lens, for instance, will make your photographs look different than all the rest. You do not want your pictures to look like they were taken by the guests. Creating unique photographs will pay dividends later when the bride orders her final album.
One way that we ensure that our images stand out from the rest is by using double lighting. Double lighting requires two flashes, a radio transmitter, radio receiver, and a light stand (or better still, an assistant). To create this look, simply hook up your on-camera flash to a radio flash transmitter. Your second flash, which can be up to one hundred feet away, should be wired to the radio flash receiver. When you push the button on your camera and your transmitter is turned on, it fires the flash on the camera and sends a signal to the receiver, and the second flash goes off as well. Having an assistant hold the light and move it around is better than putting it on a light stand. You can create some really neat effects using this system. You can backlight a couple at a reception or light a large hall, which can be difficult with just one flash. You control both lights from the camera and can fire just one or both, simultaneously. Most major camera stores carry the equipment needed to double light. Be aware that achieving good results will take practice and a thorough understanding of your flash equipment. One final tip: be sure that both of your flash units have the same output. This will make things much simpler.
AFTER THE WEDDING DAY
Good service is just as important as good photography in the wedding business. Regardless of how you are showing your images, they should have their proofs or CD/DVD within three weeks. Once the order is placed, be sure to deliver it within twelve weeks.
PRICING
Wedding photography can be very lucrative if it’s properly priced. Unfortunately, the wedding industry is filled with photographers who give us all a bad name. If you are going to be a serious player, you need to learn as much as you possibly can about posing, lighting, and customer service. To make serious money, everything must be top notch in your operation. You want people to be proud when they say, almost bragging, “Williams Photography is photographing my wedding!” Building a reputation takes time, but it will be well worth it. Whatever pricing strategy you decide on, it’s a good idea to have a statement on your wedding contracts noting that your current prices are not good forever. I have had wedding clients come in five years after their wedding to order pictures.
In my experience, you’ll have more problems with wedding clients than any other demographic—and most of the time, it’s the parents (who were never in the studio before the wedding to discuss prices, procedures, and delivery times) who cause the problems. If the bride and groom both have divorced parents, you can actually be dealing with four, five, or even six individuals, each with their opinions on what you should be charging! Be sure to have everything in writing.
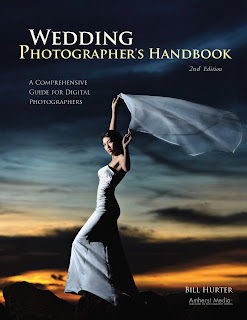
Today's post is an excerpt from the book Wedding Photographer's Handbook (2nd ed.) It is available from Amazon.com and other fine retailers.Since the bride and groom are so preoccupied at the reception, they actually get to see very little of it and therefore depend on your pictures to provide memories. You will want to photograph as many of the details and events of the reception as possible. Be sure to make several good overviews of the decorated room. This should be done just before the guests enter, when the candles on the tables are lit and everything looks perfect.
Be sure to photograph the details—table bouquets, place settings, name cards, etc. These things help enrich the finished wedding album.
The photo opportunities at the reception are endless. As the reception goes on and guests relax, the opportunities for great pictures will increase. Be aware of the bride and groom all the time, as they are the central players. Fast lenses and a higher-than-normal ISO settings will help you to work unobserved.
Be prepared for the scheduled events at the reception—the bouquet toss, removing the garter, the toasts, the first dance, and so on. If you have done sufficient preparation, you will know where and when each of these events will take place and you’ll be prepared to light and photograph each one. Often, the reception is best lit with a number of corner-mounted umbrellas, triggered by your on-camera flash. That way, anything within the perimeter of your lights can be photographed by strobe. Be certain you meter various areas within your lighting perimeter so that you know what your exposure will be everywhere within the reception area.
The reception calls upon all of your skills and instincts—and things happen quickly. Don’t get caught with an important event coming up and only two frames left in the camera. Use two camera bodies and always have plenty of exposures available, even if it means changing CF cards before you’re ready to. People are having a great time, so be cautious about intruding upon events. Observe the flow of the reception and carefully choose your vantage point for each shot. Be sure to coordinate your efforts with the wedding planner or banquet manager. He or she can run interference for you as well as cue you when certain events are about to occur, often not letting the event begin until you are ready.
Photojournalists know how to get the shot without alerting the people being photographed. Some photographers walk around the reception with their camera held low but with both hands in position on the camera so that they can instantly raise the camera to eye level, frame the image, and shoot. Others use a wide-angle lens set to wide-area autofocus in one of the camera’s autoexposure modes. With the camera at waist or hip height, the photographer will then wander around, mingling with the guests. When a shot seems to be taking place, they will aim the camera up toward the people’s faces and fire, never even looking through the viewfinder.
The final shot of the day will be the couple leaving the reception. Like so many events at the reception, planned or spontaneous, it is best to have as many angles of the event as possible, which is why so many wedding photographers work with a shooting partner or assistants.
LIGHTING
Pole Lighting. Many photographers employ an assistant at the reception to walk around with a barebulb flash on a monopod. The strobe is slaved and can be triggered by an on-camera radio transmitter or flash. The pole light can be positioned anywhere near the subjects and can be set to overpower the on-camera flash by 1 stop so that it becomes a main light. Your assistant should be well versed in the types of lighting you like to create with this rig. For instance, if he or she is at a 45-degree angle to the subject and the light is held about four feet over the subjects’ head height, the resulting lighting will resemble Rembrandt-style side lighting. If you prefer to backlight your subjects, then your assistant can position himself behind the group to create a rim-lighting effect. When taking an exposure, read the room light first and set the flash output to the same aperture as the existing light exposure. That way, the flash will not overpower the room lights.
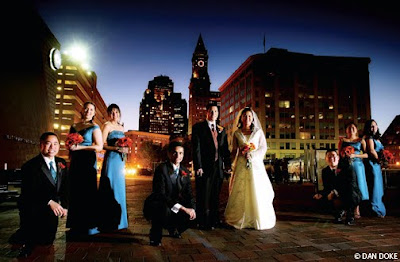
Wide-angle lenses are not only ideal for incorporating large groups in the scene but also for incorporating the scene into the portrait. This image was made with a Canon EF17–40mm f/4L USM at 17mm. The photographer, Dan Doke, says of this image, “I had been photographing a wedding party and posed a group adjacent to the New England Aquarium where the wedding was held. I was drawn to the skyline background. With my camera on a tripod I shot in Av mode and varied the aperture from f/5.6 to f/8. The exposure time was 1.3 seconds at ISO 500. I used a Quantum flash with a Freewire slave. My assistant held the second light and umbrella 45 degrees off to the right and feathered it to create a constant exposure. The flash was set for f/5.6 and I shot a test first. I love it when city lights and the sky are about the same intensity.” Note the total lack of distortion of the subjects by keeping them well away from the frame edges.
Videographer’s Lighting. If a wedding video is being produced, you will have the luxury of the videographer rigging and lighting the reception hall with hot lights—usually quartz halogen lights, which are very bright and will make your reception photography much easier. The only problem is that you will have to adjust your white balance to compensate for the change in color temperature of the quartz lights.
Handheld Video Lights. Many of the Australian wedding photographers, like David Williams and Yervant, use handheld battery-powered video lights as accent or fill lights. Williams uses a low-wattage light, around 15–20 watts, for just a little light to add mood or color or accent to a scene. Yervant uses a 100-watt Lowel Light that will overpower the room light, depending on the distance at which it is used. The effects are quite beautiful and, because you can change your white balance on the fly, the color balance will be superb and match the room lighting. Sometimes the photographers will hold the light themselves, and other times they’ll give it to an assistant if a certain lighting effect is desired. One of the great things about these lights is that you can see the effect you will get in the viewfinder. Also, since the light units are small and maneuverable, you can feather them easily, using the more dynamic edge of the light.
RINGS
The bride and groom usually love their new rings and will want a close-up shot that includes them. This is a great detail image in the album. You can use any attractive pose, but remember that hands are difficult to pose. If you want a really close-up image of the rings, you will need a macro lens and you will probably have to light the scene with flash or video light, unless you make the shot outdoors, in strong window light, or using strong available room light.
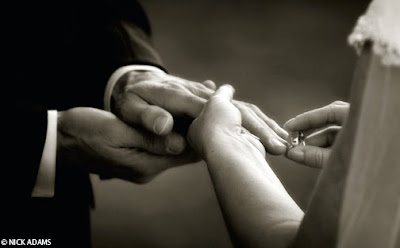
The ring exchange during the wedding ceremony is very difficult to capture. Having two shooters helps, but even then you might get blocked out by the bride, groom, or minister. This is a good one, indeed. Photo by Nick Adams.
THE CAKE-CUTTING
One of the key shots at the reception is the cutting of the wedding cake. This is often a good opportunity to make an overhead group shot of the crowd surrounding the bride and groom. Bring along a stepladder for these types of shots. A second shooter is a good idea in these situations so that details and priceless moments won’t be missed. Also, be sure to get a still life of the cake before it is cut. Both the couple and the baker/caterer will want to see a beautiful shot of their creation.
THE FIRST DANCE
The first dance is an important moment in the reception and one that you will want to document thoroughly. Don’t turn it into a cliché. Just observe and try to shoot it with multiple shooters so as not to miss the good expressions. You will be rewarded with emotion-filled, joyful moments.
One trick you can use is to tell the couple beforehand, “Look at me and smile.” That will keep you from having to circle the couple on the dance floor until you get both of them looking at you for the “first dance” shot. Or you can tell them, “Just look at each other and don’t worry about me, I’ll get the shot.”
Often, photographers will photograph the first dance by whatever available light exists (often spotlights) on the dance floor. This is possible with fast lenses and fast ISOs. Just as frequently, the photographer will use bounce flash and a slow shutter speed to record the ambient light in the room and the surrounding faces watching the couple’s first dance. The bounce flash will freeze the couple, but there is often some blurring due to the slow shutter speed.
Usually, it is best to photograph the first dance as a vertical, including some of the dance floor and surroundings for ambience.
THE BOUQUET TOSS
The bouquet toss is one of the more memorable shots and always looks best when it’s spontaneous. You need plenty of depth of field, which almost dictates a wide-angle lens. You’ll want to show not only the bride but also the expectant faces in the background, which usually necessitates two shooters. Although you can use available light, the shot is usually best done with two flashes—one on the bride and one on the ladies hoping to catch for the bouquet. Your timing has to be excellent as the bride will often “fake out” the group (and you), just for laughs. Try to get the bouquet as it leaves the bride’s hands.
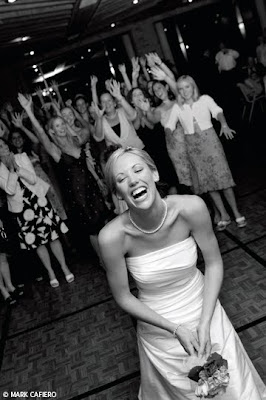
The bouquet toss is often filled with trickery as the bride tries to “fake out” the ladies behind her. Here, Mark Cafiero captured a lovely bride in the middle of a belly laugh. Mark fired a bounce flash at the bride and relied on enough ambient light to light the waiting young brides-to-be. Mark made the shot with a Canon EOS 20D and 24mm lens at 1/50 second at f/3.5 at ISO 400 with the bounce flash held slightly to camera right. Mark was standing on a chair to get above the scene for a better overall view.
TABLE SHOTS
Table shots are the bane of every wedding photographer’s day. They rarely turn out well, are often never ordered, and are tedious to make. If your couple absolutely wants table shots, ask them to accompany you from table to table. They can greet their guests, and it will make the posing quick and painless. You might also consider talking the couple into one big group shot that encompasses nearly everyone at the reception. These are always fun to participate in and to photograph.
LITTLE ONES
One of the best opportunities for great pictures comes from spending some time with the smallest attendees and attendants: the flower girls and ring bearers. They are thrilled with the pageantry of the wedding day and their involvement often offers a multitude of picture opportunities.
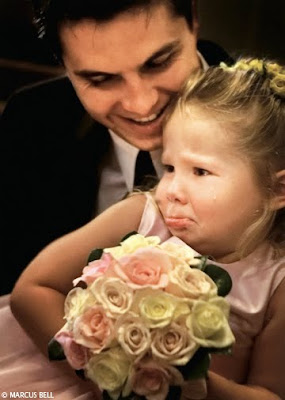
The little ones are especially fragile on the wedding day and will present some wonderful photo opportunities. Photograph by Marcus Bell.
Today's post is an excerpt from the book Brett Florens' Guide to Photographing Weddings. It is available from Amazon.com and other fine retailers.Once you have sent your quote to a potential client, more often than not they will want to meet with you to have a hands-on look at a portfolio, perhaps a completed album, and also to suss out whether they feel comfortable with you as a person or not. This is where you need to close the deal. They already know what you propose to charge and have probably seen your online portfolio. It’s your approach, ideas, and personality that are going to get them to sign on the dotted line and pay the deposit.

Available light, ISO 400 f/5.6 at 1/125 second, M mode, Nikkor 70–200mm f/2.8 lens. Carefree and dreamy, the engagement session captures the day-to-day romance that is felt between couples about to be wed.
Remember that you will be spending a lot of time with this couple on their day; being friendly, engaging, and taking time to listen to their needs and questions should make them feel comfortable being around you. A photographer who seems arrogant and unfriendly will not be a popular choice—no matter how brilliant his images may be. Dedicate at least an hour to this meeting, and don’t take calls or chat to other clients during this time. It is important to make them feel that they are the only clients you’ve ever had. They must feel that their wedding is as important to you as it is to them. Be careful not to oversell yourself; they are there because they already like your work, so it is unnecessary to go on about how fantastic your work is! Of course, on the other end of the scale, you need to appear to be confident and enthusiastic about your images. Showing them a recently completed album should solidify their confidence in your ability to produce a hot-shot album from start to finish; they’ll know that they are not being fooled by a portfolio of thirty outstanding shots from, perhaps, a choice of a hundred different weddings.
Interact with your clients and show a real interest in their choice of wedding venue and the other suppliers that they have chosen. Let them know if you have worked at their proposed venue before and, if possible, show them images of previous weddings at that venue. This is also an opportunity to show them other peripheral products such as framed images, canvases, and various album choices; these might become add-ons to the package that they choose.
Once the couple have decided to employ you to photograph their wedding, you may want to plan an additional meeting closer to the date to discuss timing and finer details. Discuss, and even advise, the time of the service relative to sunset, as well as the timing of hair and makeup prior to your arrival, letting the client know how far you expect them to be ready when you get to them. I like to have at least an hour and a half with the bride before the ceremony, and I require that she is 80 percent ready when I get to the venue where she is getting dressed. This means that she needs to make sure in advance that the hairdresser and makeup artist will not leave her for last. It is pointless for the photographer to arrive before the ceremony when all he can photograph is a stressed bride in curlers! Inquire as to whether the groom requires preparation shots, too. More often than not, the groom and his best men have something relaxing planned for the morning of the wedding, be it surfing, golfing, or quad-biking. If the package allows the time, these are great shots to add depth to the album.
Make sure that you get all the contact details from the bride and groom, as well as their parents’ details if possible. It is also useful to have the details of all the other vendors that you will be working with. After a few years in the business, you will have the inside scoop on which vendors are always running late, which are pedantic about time, and what their work is like.
Also important to discuss with the bridal couple are their expectations with regard to the images that they want shot. Going through your portfolio together, they will give you a feel as to what images they would ideally like. This is also a good time to choose the venue for the bridal shoot, obviously within a reasonable proximity to the reception venue.
Explain to them, at this stage, that good images do take a certain amount of time and that time management on the wedding day is important. Chatting too long after the service with guests, while the light is fading fast, will necessitate a nudge from you. It’s good to let them know that you will help them to stick to a schedule to optimize the opportunity for outstanding images. The bridal shoot is usually in the region of one hour, and allowances for this must be made prior to the wedding so that the couple ensures that guests are entertained with cocktails or snacks during the time that they are away from them.
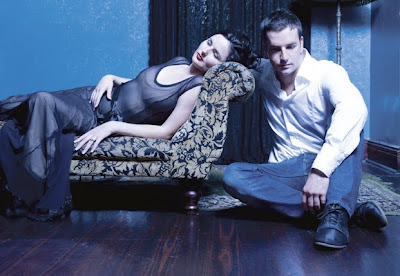
Elinchrom 600RX Monolight, ISO 100, f/11 at 1/125 second, M mode, Nikkor 24–70mm f/2.8 lens. From the same engagement shoot as the image on the previous page, this shot shows a completely different side of the couple, expressing their interest in fashion and editorial-style images.
You will need to inform them of the postproduction process, which will involve image enhancement, color management, conversion of raw images, the resizing of images for printing, and the construction of the album. Give them a timeline for when they can expect the finished product. If they are going to be involved in the choosing of the images for the album, then appointments must be made. Bear in mind that client involvement may increase production time and should be incorporated into your costs.
Closer to the day of the wedding, you may be expected to deal with phone calls from an anxious bride needing answers to a dozen questions. Obviously, this is also a time to put the bride at ease and confirm her feeling of confidence in you. You also may be asked to attend the rehearsal at the church. If you feel that you want to charge for your time at this rehearsal, then you must make it known before attending. At an early stage in your career, it may be beneficial to attend; the rehearsals are often set for the same time of day as the ceremony, so you will have a good opportunity to see what the lighting conditions are like and to scout out the ceremony venue for photo opportunities.
Buy this book from Amazon.
Today's post is an excerpt from the book Existing Light Techniques for Wedding and Portrait Photography, by Bill Hurter. It is available from Amazon.com and other fine retailers.
Nature provides every lighting variation imaginable—that’s why so many images are made with it. Often, the light is so good that there is just no improving on it.
For example, I used to work for a major West Coast publishing company that specialized in automotive magazines. One of the studios we used for photographing cars was massive, with a ceiling that was between three and four stories high. Below the ceiling was a giant scrim suspended on cables so that each of the four corners could be lowered or raised independently. Enormous banks of incandescent lights were bounced into the scrim to produce a huge milky-white highlight the length of the car—a trademark of automotive photography. Despite the availability of this space, if time and the weather were on their side, the staff photographers would invariably opt to photograph the car at twilight, when the setting sun, minutes after sunset, creates a massive skylight in the Western sky. No matter how big or well equipped the studio, nature’s light is far superior in both quantity and quality (although it fades rather quickly).
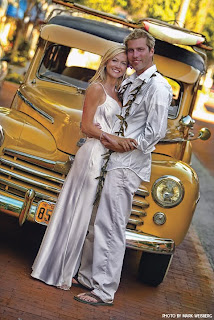
This is the classic Southern California wedding portrait, complete with the kelp necklace on the surfer groom. The light is exquisite because there are buildings to either side blocking the overhead light. The color coordination is also perfect. Photo by Mark Weisberg.
In order to harness the power of natural light, one must be aware of its various personalities. Unlike the studio, where you can set the lights to obtain any effect you want, in nature you must use the light that you find or find ways to modify it to suit your needs.
Avoid Direct Sunlight
By far the best place to make outdoor images is away from direct sunlight. Look for a clearing in the woods, where the trees block the overhead light from hitting the subject. From the clearing to the side, diffused light will filter in, producing better modeling on the face than in an open area (where the light is overhead in nature and leaves deep shadows in the eye sockets and under the nose and chin of the subjects).
Kevin Jairaj, who makes it a habit to look for good directional lighting, recommends looking for an outdoor portico, where light from above is blocked by a roofline or other architectural elements. This allows soft directional light to spill in from the sides, usually through open columns that provide beautiful compositional elements. Depending on how you position your subjects in relation to this directional light, it can be frontal or side-lighting—but it always has a singular and well-defined source point. Kevin says, “When outdoors, I love shooting under awnings or building tops where I am able to see the light coming in from one side. I normally place the bride so that her face is turned into the directional light producing soft Rembrandt lighting on her face.”
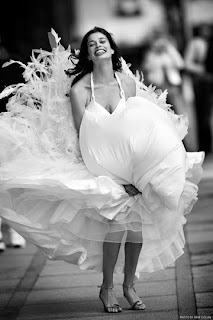
Midday light doesn't have to be harsh, especially where tall buildings block the direct light. The lighting is, however, still overhead in such situations. Knowing this helped Mike Cólon, who waited until the bride's head was raised, taking advantageof the soft overhead light.
Working at Midday
Working at midday is a necessity for wedding photographers, as most ceremonies are during the middle of the day.
The best system if working at midday is to work in shade exclusively. Try to find locations where the background has sunlight on dark foliage and where the difference between the background exposure and the subject exposure is not too great—no more than 2.5 stops.
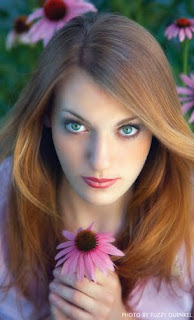
Fuzzy Deunkel is a master of working in any lighting situation. For this image, he posed his subject on a front porch and and masterfully redirected light onto his subject, making it look as though she was photographed in a studio with a full complement of lights.
It is often impossible to avoid photographing out in the open sunlight on wedding days. In this case, the best strategy is to use the sun as a backlight and bias the exposure towards the shadow side(s) of the subject(s). This is where it’s advisable to bring along an assistant who can flash a reflector into the shadow side of your couple to fill in the effects of the backlighting. A reflector is most effective when held below waist height and angled to bounce the overhead backlight back up onto the subject. Moving the reflector around and up and down will give you an idea of how much light it can reflect and where to position it. In bright situations, use a white reflector, so as not to overpower the natural light. In very soft light, use a gold or silver reflector for increased efficiency.
It is important to check the background while composing a portrait in direct sunlight. Since there is considerably more light than in a portrait made in the shade, the tendency is to use an average shutter speed like 1/250 second with a smaller-than-usual aperture like f/11. Small apertures will sharpen the background and distract from your subject. Preview the depth of field to analyze the background. Use a faster shutter speed and wider lens aperture to minimize background effects in these situations. The faster shutter speeds may also make it impossible to use flash, so have reflectors at the ready.
Low-Angle Sunlight
If the sun is low in the sky, you can use cross lighting to get good modeling on your subject. To do this, simply turn your subject into the light so as not to create deep shadows along laugh lines and in eye sockets. (Note: If photographing a group, be sure to position your subjects so that one person’s head doesn’t block the light from striking the face of the person next to him or her.) In this scenario, there must be adequate fill-in from the shadow side of camera to ensure that the shadows don’t go dead. This is often done using a flash set to about a stop less than the daylight exposure. Of course, a reflector can also be employed (and carefully placed) to bounce the direct sunlight back into the shadow side of the face. Again, it’s always best to use an assistant in this situation.
After Sunset
As many of the great photographs in this book illustrate, the best time of day for making great pictures is just after the sun has set. At this time, the sky becomes a huge softbox and the effect of the lighting on your subjects is soft and even, with no harsh shadows.
There are, however, two problems with working with this great light. First, it’s dim. You will need to use medium to fast ISOs combined with slow shutter speeds. In these situations, selecting an image-stabilization lens will expand your options by allowing you to handhold at extremely slow shutter speeds like 1/4 or 1/8 second.
The second problem in working with this light is that twilight does not produce catchlights, the white specular highlights in the eyes of the subjects that make them sparkle with life. For this reason, most photographers augment the twilight with flash, either barebulb or softbox-mounted. The flash can be up to two stops less in intensity than the skylight and still produce good eye fill-in and bright catchlights.
Controlling the Background
For a portrait made in the shade, the best type of background is monochromatic. If the background is all the same color, the subjects will stand out from it. Problems arise when there are patches of sunlight in the background. To minimize these, you can shoot at a wide lens aperture and use the shallow depth of field to blur out the background. When working outdoors, some photographers also control the background by placing more space between it and the subject, throwing the background further out of focus.
Another way to minimize a distracting background is in postproduction retouching and printing. By burning-in or diffusing the background, you can make it darker, softer, or otherwise less noticeable. This technique is really simple in Photoshop, since it’s fairly easy to select the subjects, invert the selection so that the background is selected, and perform all sorts of manipulations on it. You can also add a vignette of any color to visually subdue the background. On outdoor shoots in particular, one thing you must especially watch out for is subject separation from the background. A dark-haired subject against a dark-green forest background will not separate, creating a tonal merger. Adding a back-side or edge reflector to kick some light onto the hair would be a logical solution to such a problem.
Cool Skin Tones
If your subject is standing in a grove of trees and is surrounded by foliage, there is a good chance green (or cyan from the open sky) will be reflected onto their skin tones. This can be hard to detect, since your eyes will adjust to the off-color rendering. The best strategy is to check the coloration in the shadow areas of the face. If the color of the light is neutral, you will see gray in the shadows; if not, you will see either green or cyan.
Buy this book from Amazon


 Posts
Posts


